Test와 Test 코드
✒️ 2025-05-28 13:09 내용 수정
스프링부트3 자바 백엔드 개발입문 내용 참고 및 정리
Test와 관련된 용어들
- 테스트(Test) : 의도대로 프로그램이 잘 작동하는지 확인하는 품질 검증 과정이다.
- Test 도구를 활용해 Test 코드를 작성하여 테스트를 진행할 수 있다.
- 예상 데이터 작성, 실제 데이터 획득, 두 데이터 비교 후 검증 과정으로 진행한다.
- 디버깅(debugging) : 코드에서 Test를 통과하지 못했을 때 잘못된 부분을 찾아 고치는 과정이다.
- 테스트 케이스(test case) : Test 코드 작성 시 Test의 성공과 실패 경우를 의미한다.
- 테스트 주도 개발(Test Driven Development) : Test 코드를 만든 후 Test를 통과하는 최소한의 코드부터 시작하여 점진적으로 코드를 개선 및 확장해 나가는 개발 방식이다.
Test 코드 작성하기
- 실습 진행은 교재에 나온대로 Service와 Transaction#REST API에 Service 계층 추가 코드에 이어서 진행했다.
- Spring에서도 단위 테스트를 진행할 수 있으며, 단위 테스트를 참고하여 진행하면 된다.
- Spring과 Spring boot 모두 JUnit을 사용해서 Test를 진행했다.
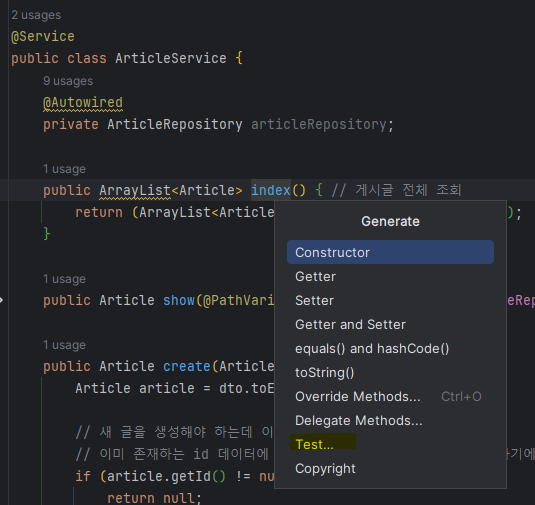
ArticleService를 검증하는 Test 코드 작성을 위해 Test할 클래스의 메소드에 마우스 우클릭을 눌러Generate -> Test를 선택한다.
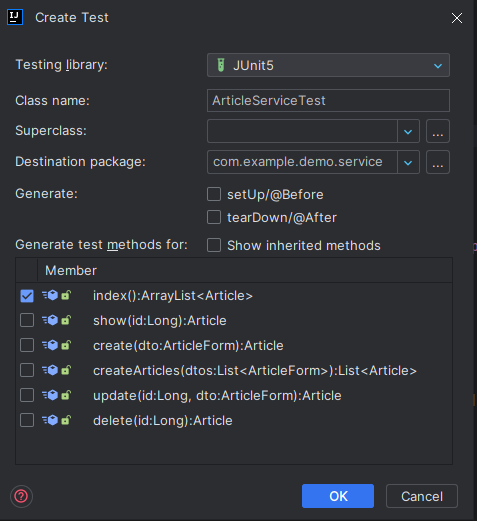
- Create Test 창에서 Testing Library를 JUnit5로 선택하고, Generate test methods for 항목에서
index()메소드만 먼저 선택한 후 OK를 누른다.
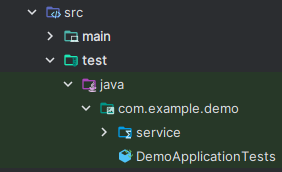
ArticleServiceTest클래스가src/test/java/com.example.package_name/service패키지 내에 생성된 것을 확인할 수 있다.test이후의 경로는src/main패키지 내에서의 경로와 거의 동일하다.- 클래스의
@SpringBootTestAnnotation은 해당 클래스를 스프링 부트와 연동해 통합 테스트를 수행한다는 것을 선언해준다. - 클래스의 메소드에 있는
@TestAnnotation은 해당 메소드가 테스트를 위한 코드임을 명시해준다. - Test 코드에선 Test할 클래스의 객체를 주입해야 하기 때문에 의존성 주입을 추가한다.
- 의존성 주입(Dependency Injection) 참고.
- 여기서는
ArticleService를 Test할 예정이므로ArticleService객체를 자동 주입했다.
package com.example.demo.service;

import org.junit.jupiter.api.Test;
import org.springframework.beans.factory.annotation.Autowired;
import org.springframework.boot.test.context.SpringBootTest;

import static org.junit.jupiter.api.Assertions.*;

@SpringBootTest  // 테스트를 수행하는 클래스
class ArticleServiceTest {

    @Autowired
    private ArticleService articleService;

    @Test // 테스트를 위한 코드 선언 Annotation
    void index() {
    }
}
- 이제 메소드를 Test하기 위해 예상 데이터 작성, 실제 데이터 획득, 두 데이터 비교 후 검증 과정을 작성한다.
package com.example.demo.service;

import com.example.demo.entity.Article;
import org.junit.jupiter.api.Test;
import org.springframework.beans.factory.annotation.Autowired;
import org.springframework.boot.test.context.SpringBootTest;

import java.util.ArrayList;
import java.util.Arrays;
import java.util.List;

import static org.junit.jupiter.api.Assertions.*;

@SpringBootTest // 테스트를 수행하는 클래스
class ArticleServiceTest {

    @Autowired
    private ArticleService articleService;

    @Test // 테스트를 위한 코드 선언 Annotation
    void index() {
        // 1. 예상 데이터 작성
        Article first = new Article(1L, "1번 데이터", "Test number 1");
        Article second = new Article(2L, "2번 데이터", "2nd Test");
        Article third = new Article(3L, "3번 데이터", "Test 3");
        // 데이터 묶음을 List로 변환
        List<Article> expected = new ArrayList<Article>(Arrays.asList(first, second, third));

        // 2. 실제 데이터 획득
        // main 패키지의 클래스의 메소드를 호출한 결과를 가져옴
        List<Article> articles = articleService.index();

        // 3. 두 데이터 비교 후 검증
        // assertEquals(a, b) : JUnit에서 제공
        // 예상 데이터 a와 실제 데이터 b를 비교해 두 데이터가 일치하면 Test 통과
        assertEquals(expected.toString(), articles.toString());
    }
}
- 서버를 껐다가 켤때마다 메모리가 초기화되어 DB에 데이터가 없으므로 자동으로 더미 데이터를 추가하는 기능을 이용해 DB에 미리 데이터를 넣어둔다.
- 이미 생성된 데이터와 예상 데이터를 비교할 수 있도록 설정하기 위해 더미 데이터를 설정한다.
- Spring boot 2.5 버전 이상부턴
data.sql을 사용한 데이터 초기화를 권장하진 않지만 현재 실습 편의상 사용하였다.application.properties나application.yml에서spring.jpa.defer-datasource-initialization=true를 추가한다.
src/main/resources에data.sql파일을 생성하여 article 데이터 3개를 예상 데이터 목록과 동일하게 작성한다.
-- data.sql
INSERT INTO article(id, title, content) VALUES (1, '1번 데이터', 'Test number 1');
INSERT INTO article(id, title, content) VALUES (2, '2번 데이터', '2nd Test');
INSERT INTO article(id, title, content) VALUES (3, '3번 데이터', 'Test 3');
# application.yml
spring:
  jpa:
    defer-datasource-initialization: true
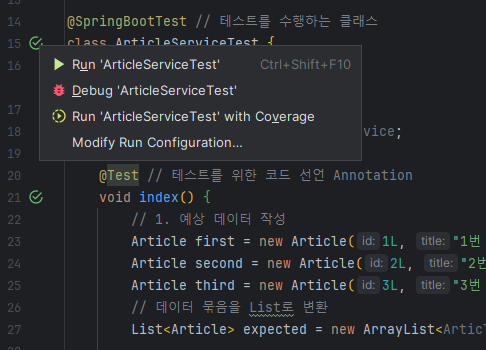
- 코드에서 메소드 왼쪽에 재생 버튼을 누르고,
Run ArticleServiceTest를 선택한다.
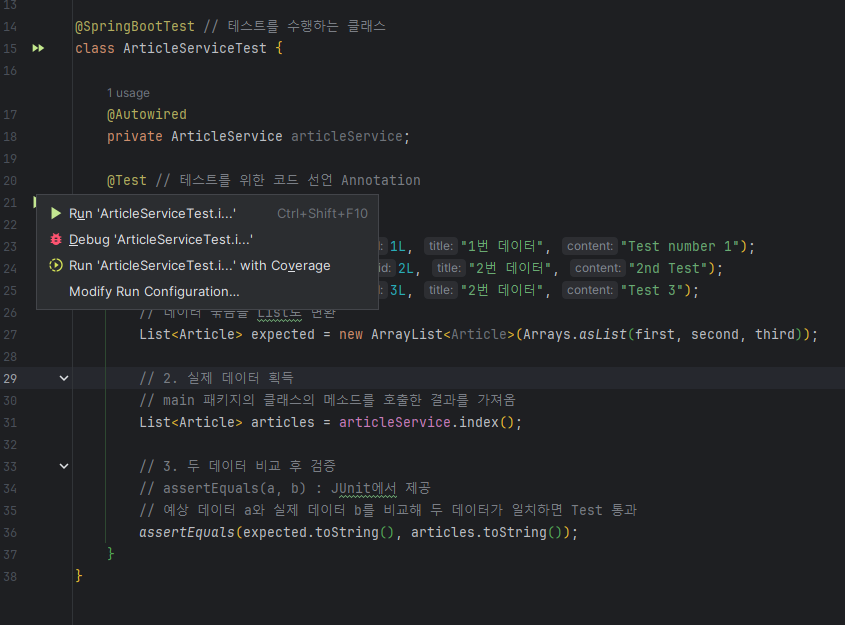
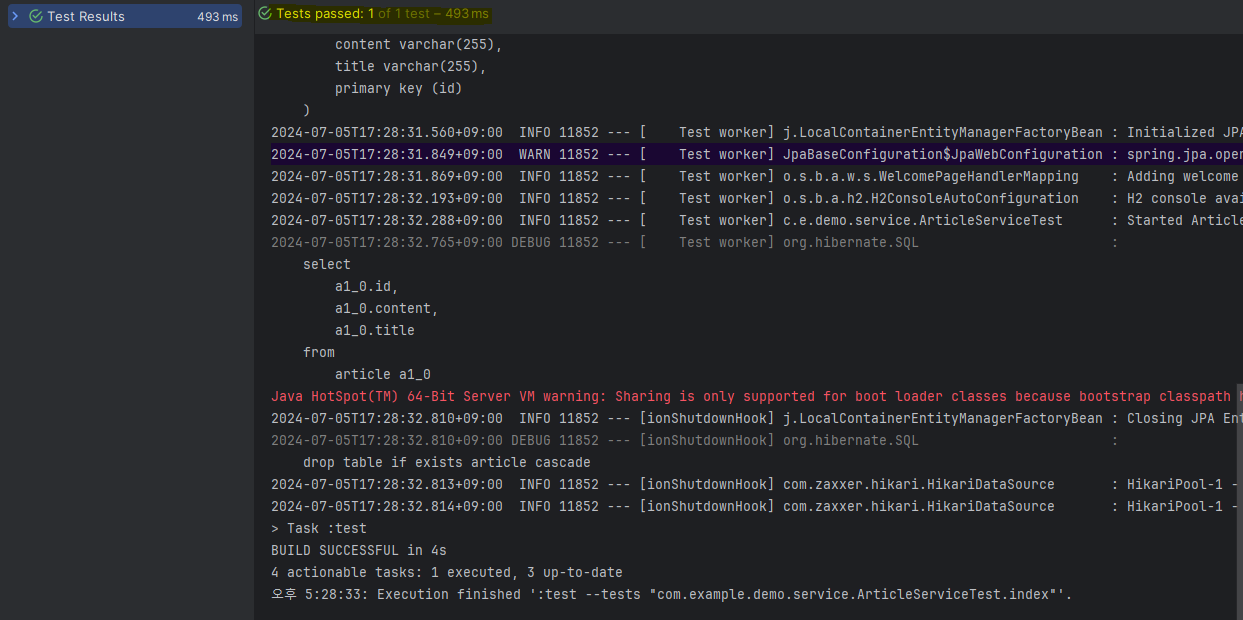
- Test를 통과했다면 Tests passed 상태로 뜬다.
Test 케이스별 코드 작성하기
- 이번엔 Test 케이스별로 코드를 작성하기 위해
ArticleService클래스의show()메소드의 테스트 코드를 작성한다.
package com.example.demo.service;
import com.example.demo.entity.Article;
import org.junit.jupiter.api.Test;
import org.springframework.beans.factory.annotation.Autowired;
import org.springframework.boot.test.context.SpringBootTest;
import java.util.ArrayList;
import java.util.Arrays;
import java.util.List;
import static org.junit.jupiter.api.Assertions.*;
@SpringBootTest // 테스트를 수행하는 클래스
class ArticleServiceTest {
@Autowired
private ArticleService articleService;
@Test // 테스트를 위한 코드 선언 Annotation void index() {
// 1. 예상 데이터 작성
Article first = new Article(1L, "1번 데이터", "Test number 1");
Article second = new Article(2L, "2번 데이터", "2nd Test");
Article third = new Article(3L, "3번 데이터", "Test 3");
// 데이터 묶음을 List로 변환
List<Article> expected = new ArrayList<Article>(Arrays.asList(first, second, third));
// 2. 실제 데이터 획득
// main 패키지의 클래스의 메소드를 호출한 결과를 가져옴
List<Article> articles = articleService.index();
// 3. 두 데이터 비교 후 검증
// assertEquals(a, b) : JUnit에서 제공
// 예상 데이터 a와 실제 데이터 b를 비교해 두 데이터가 일치하면 Test 통과
assertEquals(expected.toString(), articles.toString());
}
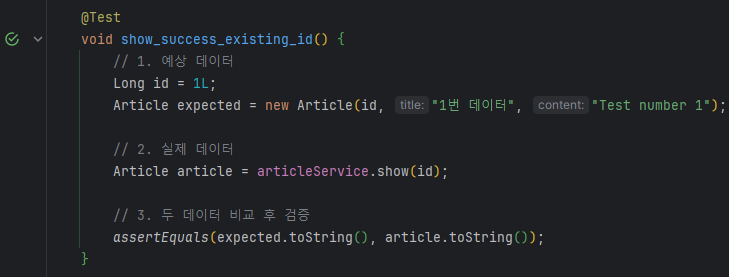
@Test
void show_success_existing_id() {
// 1. 예상 데이터
Long id = 1L;
Article expected = new Article(id, "1번 데이터", "Test number 1");
// 2. 실제 데이터
Article article = articleService.show(id);
// 3. 두 데이터 비교 후 검증
assertEquals(expected.toString(), article.toString());
}
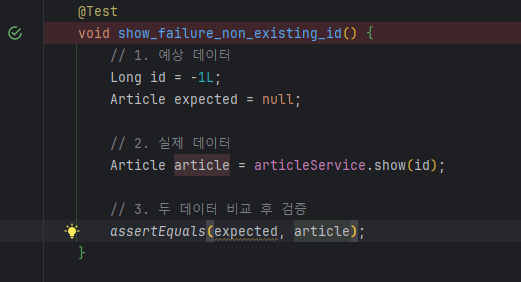
@Test
void show_failure_non_existing_id() {
// 1. 예상 데이터
Long id = -1L;
Article expected = null;
// 2. 실제 데이터
Article article = articleService.show(id);
// 3. 두 데이터 비교 후 검증
assertEquals(expected.toString(), article.toString());
}
}
- 존재하는
id와 그 id에 해당하는 데이터가 일치하면(더미 데이터와 동일) Test를 통과한다.
- 존재하지 않는
id를 예상 데이터에 넣었을 때는 해당id를 가진 데이터가 없으므로 null이 떠야 한다. 실제 DB에도 해당id를 가진 데이터가 없으므로 null을 반환할 것을 예상할 수 있으며, 이를 Test로 비교하면 Test가 통과되었다고 뜬다.
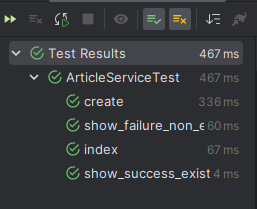
Test 한 번에 가동
- Test 코드들을 한 번에 모두 가동할 땐 Test 클래스 우측의 버튼을 눌러
Run ArticleServiceTest를 누른다.
- 결과 확인 시 Run 창에서
Show passed버튼(사진에서 체크 표시가 있는 항목 아이콘)을 누르면 통과된 Test를 모두 포함하여 결과를 확인할 수 있다.